
Deploy a Wireless Mesh Network with Virtual Controller on VigorAP
The Virtual Controller allows users to manage multiple APs connected by Wireless or Wired links in the same network. With the Virtual Controller, the network manager can easily deploy a large wireless network and share the same wireless settings by adding Nodes to the Root’s device list.
Vigor Mesh and AP Management are functions used to manage multiple APs in the Virtual Controller.
This article demonstrates how to deploy a wireless Mesh network using these two management functions and the common scenarios where they can be applied.
The Virtual Controller is supported in DrayOS5 models, such as AP1062C, AP962C, AP805...etc.
Configure the wireless settings before starting:
1. For better compatibility, it is strongly recommended that all APs use the same operating system (e.g. DrayOS5), the same country code, and the latest released firmware version.
2. Select an AP planned to be a Root, and access the WUI page to configure the wireless settings we want to sync to Nodes.
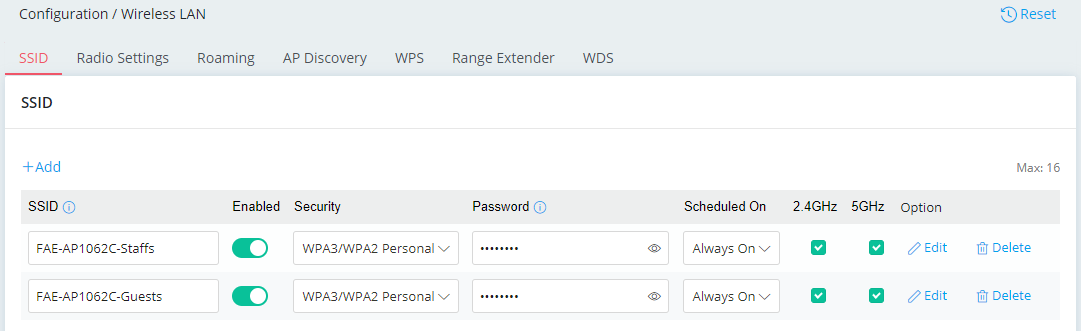
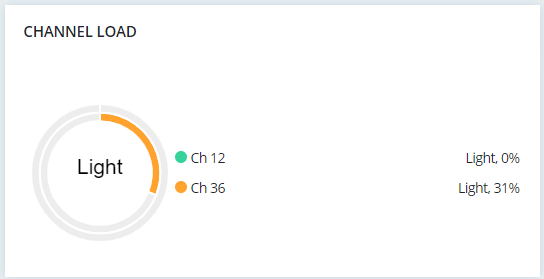
Please select a channel with a load lower than 70%.
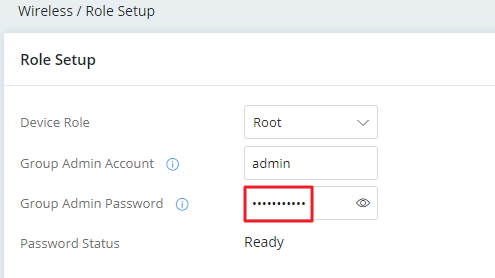
3. Change the Group Admin Password in Role Setup. This value will be the Administrator Password of the Nodes after they complete the configuration sync.
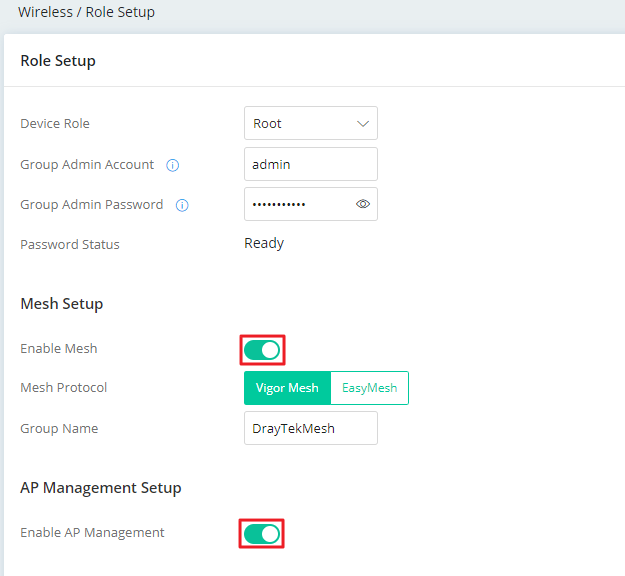
4. (Optional)Make sure Mesh and AP Management are enabled. By default, Mesh and AP Management are enabled. We can ignore this step if the Root is in the default configuration.
Deploy the wireless network with Vigor Mesh:
Vigor Mesh is a proprietary mesh function developed by DrayTek. Supposing there are multiple APs that support the same Vigor Mesh version as the Root, the Root can manage those APs by adding them to the mesh group by Wireless or Wired uplinks.
In general, the DrayOS5 models share the same Vigor Mesh version(R2). The Root will add them using the Vigor Mesh function first.
- Vigor Mesh (R1) - AP802 / AP903 / AP912C / AP918 / AP920 / AP1000 / AP960C / AP1060C
- Vigor Mesh (R2) - Vigor1100ax / Vigor2136ax / AP1062C / AP805 / AP905 / AP962C / AP906
Follow the steps below to add Nodes to the Mesh group:
Note:
- All nodes are in the default configuration and do not change the password of the admin account in this example. If we have logged in to a node and change the password, the status will show "Auth Fail" after it joins the device list. It is recommended that the node be reset before the deployment.
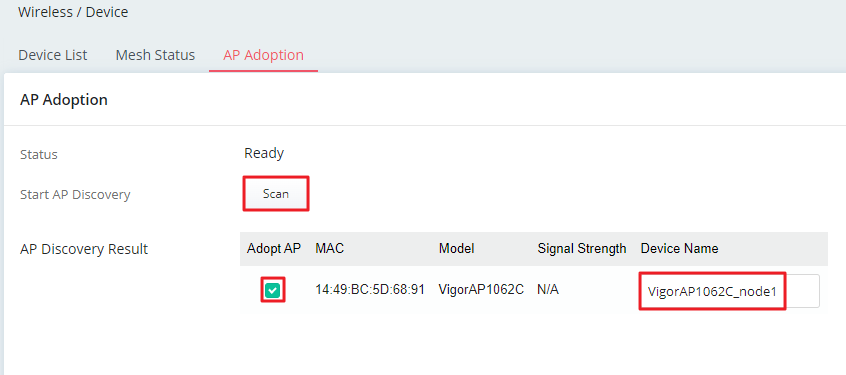
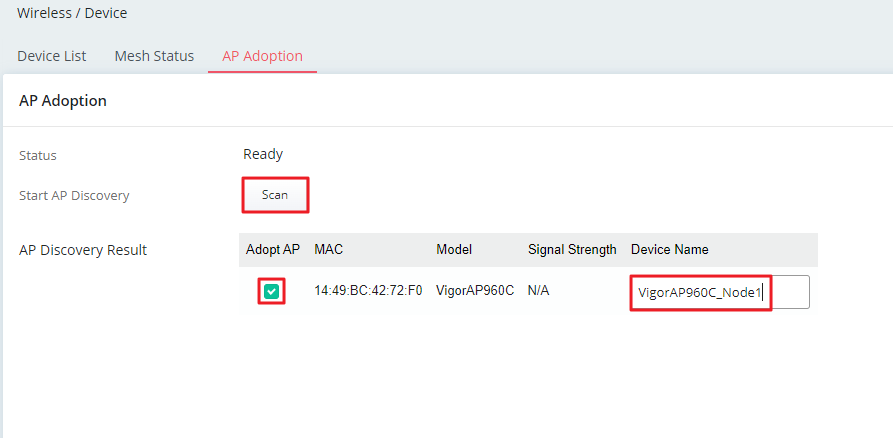
1. Power on Nodes. Access the WUI page of the Root and go to the AP Adoption tab in Wireless / Device.
- Click Scan to find other Nodes.
- Select Nodes and enter the name for them.
- Then click Apply and wait for the process to complete.
By default, the Wireless uplink and downlink are set to Auto. The Root can still scan the Wireless Node during the DFS detection.
If the uplink or downlink is forced to use 5G only or 2.4G radio is disabled, please ensure that the device is not in DFS detection. The Root and Wireless Node may not find each other when one of them is in the DFS detection.
It is recommended that new Nodes be connected to the same gateway with the Root by an Ethernet cable and added to the mesh group using the wired uplink first.
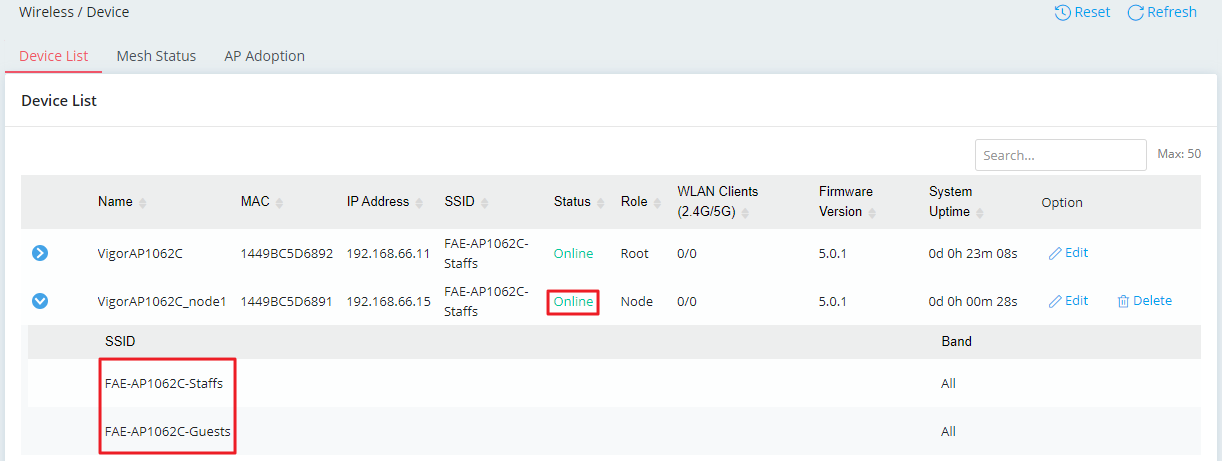
2. Wait for all Nodes to sync settings with the Root. Once the configuration sync is complete, the status of each AP will be displayed as Online in the Device List, and all APs will share the same SSIDs.
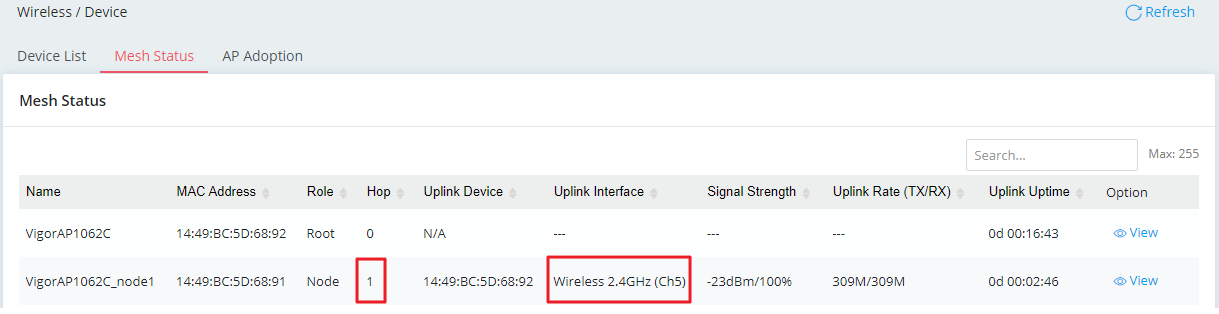
In Mesh Status, we can see the hop and uplink interface of Nodes.
3. Move Nodes to the desired locations to extend the WiFi coverage. Once powered on, the Nodes will attempt to reconnect to the Mesh Network using either Wired or Wireless uplinks.
Auto Device Role for the Vigor Mesh
In DrayOS5 platform, Vigor Mesh supports the option Auto in the Device Role. This means that Vigor AP can switch the role to the Root or Node automatically according the different conditions.
The network manager no longer needs to define whether this AP should be a Root or Node. We can deploy the Mesh network easily by just powering on APs and adopt them to a Mesh group on the WUI of the Root.
The wireless network is also flexible since all APs can take actions themselves to recover and backup the Mesh Connection once a Root disappears or cannot access to the Internet.
Below are the mechanism and diagrams that show how Vigor APs switch their device role under different conditions.
The mechanism is mainly based on the gateway's availability by an Ethernet cable.
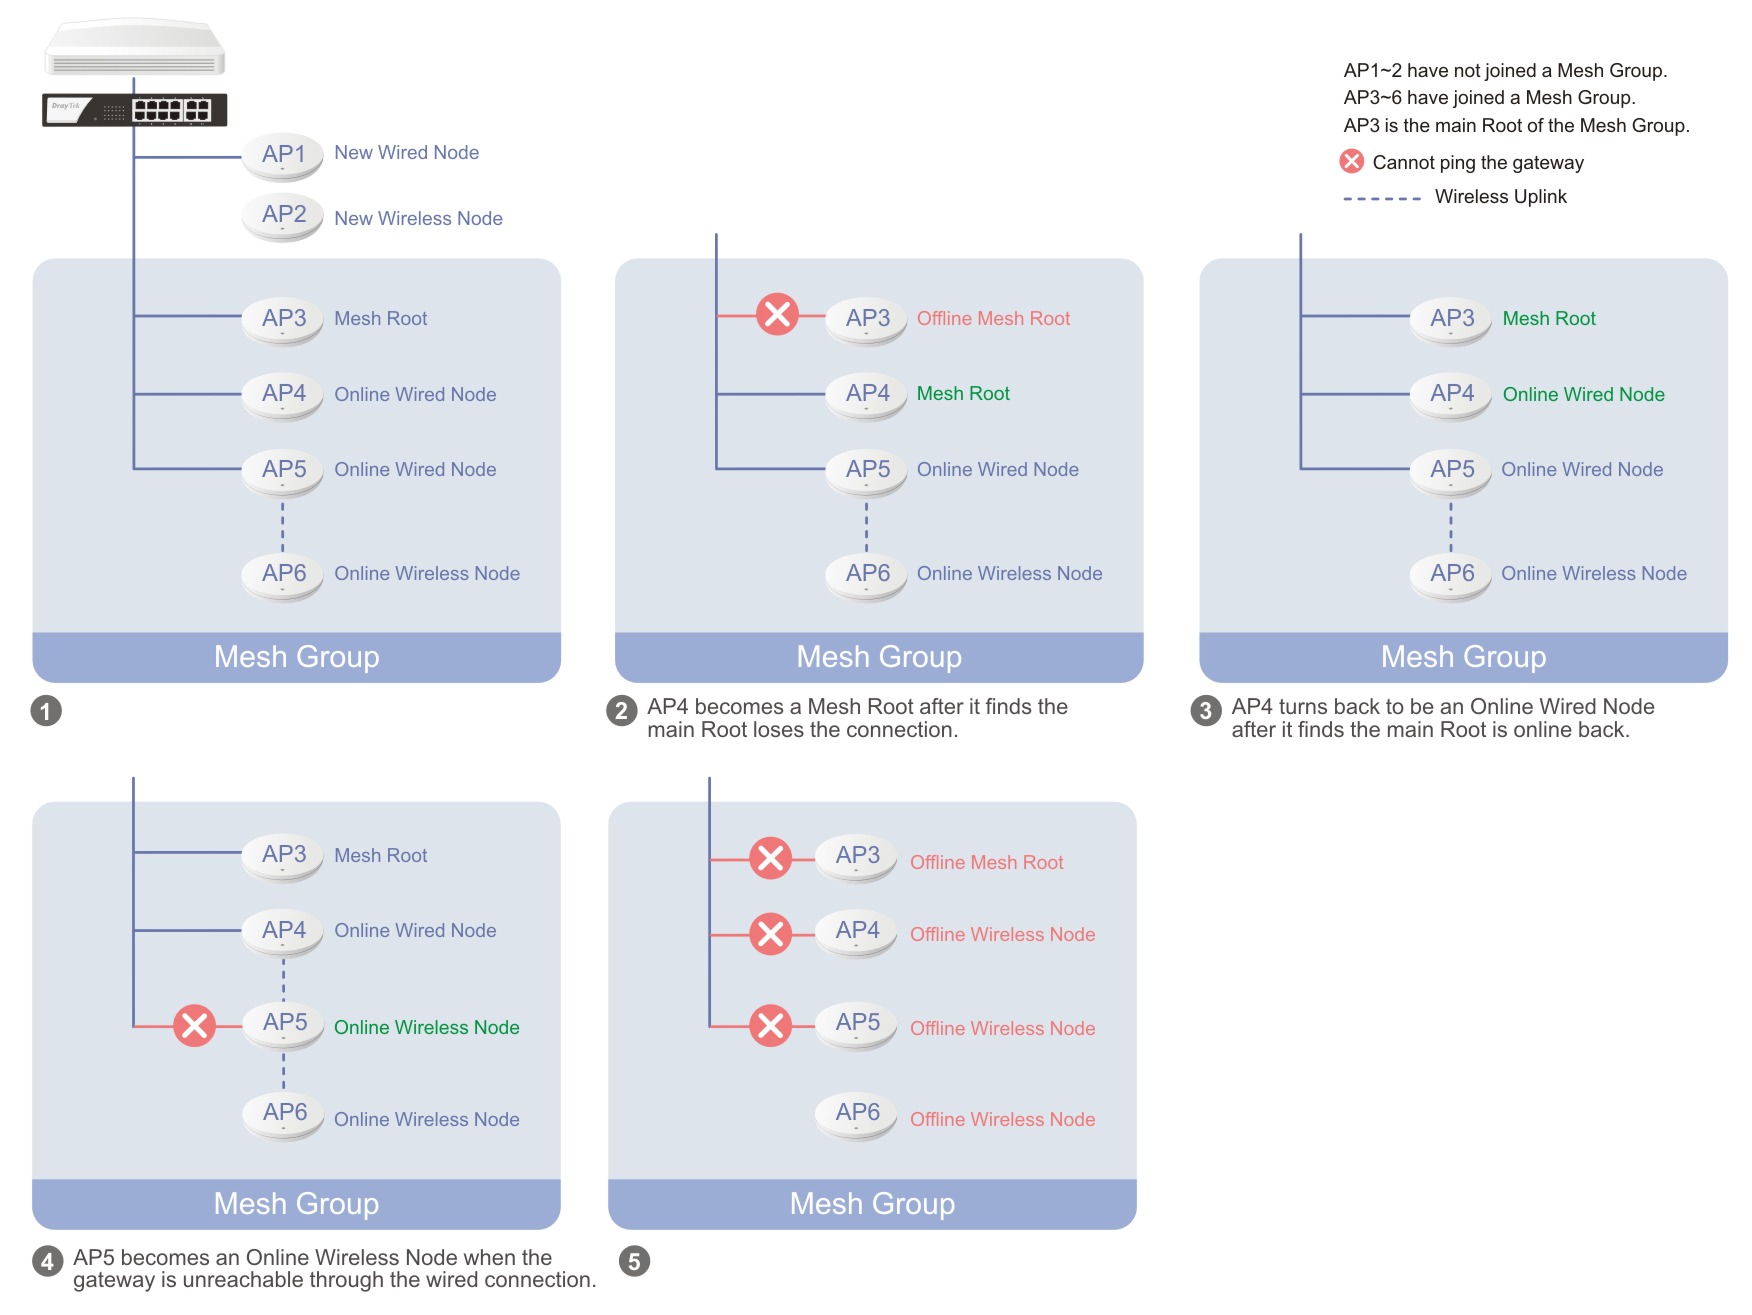
APs have not joined the Mesh Group
- Gateway is reachable through the Ethernet. => New Wired Node (see AP1.)
- Gateway is unreachable through the Ethernet for about 20 seconds. => New Wireless Node (see AP2.)
In the Mesh Group
- Gateway is unreachable through the Ethernet. => Online Wireless Node (see AP5 in the fourth diagram.)
- Gateway is reachable through the Ethernet but there is a Mesh Root which has higher priority(earlier order in the Group List). => Online Wired Node (see AP4 in the first diagram.)
- Cannot detect a Mesh Root that has higher priority(earlier order in the Group List) for about 10 seconds. => Mesh Root (see AP4 in the second diagram.)
- When the Mesh Root(AP3) that has higher priority(earlier order in the Group List) is back online, => Online Wired Node (See AP3 and AP4 in the third diagram.)
- Online Wireless Node cannot find the Root for about 40 seconds. => Offline Wireless Node (See the last diagram.)
Note:
- After the AP clicks Scan in AP Adoption, the device role will be forced to set as Root. Once the gateway is unavailable, it will not switch to a Wireless Node and reconnect back.
- VigorMesh can add new Nodes in the Mesh Group through both Wireless and Wired. However, it is recommend to connect new Nodes to the Root using Ethernet cables and add them to the Mesh Group first. Wait for the configuration sync to complete before moving the Nodes to their intended locations.
- VigorMesh supports up to 3 hops. However, it is recommended to limit the Mesh network to 2 hops or fewer for optimal performance.
- It is suggested to make the Uplink Signal Strengths of all Wireless Nodes be greater than -65 dBm.
- A Wireless Node with an Ethernet cable should not loop to another Node.
- A Mesh Group can be reset by the Reset button in Virtual Controller >> Wireless >> Device >> Device List. If resetting a Root, all Online Nodes will be notified to reset. For those Nodes that cannot be reset remotely, please reset them manually. If resetting a Node, the device will become a New Node. The Wireless SSID settings of the device will be reset.
- The number of compatible managed APs is defined by the Virtual Controller's device list, supporting one Root(the device itself) and up to seven Wireless Nodes.
Deploy the wireless network with AP Management:
AP Management can only manage APs by wired uplink. For the Vigor APs that don't support the same Vigor Mesh version with the Root AP, we can connect them to the same gateway by Ethernet cables and manage them using AP Management.
In general, all old VigorAPs such as AP802, AP903, AP912C...etc, use the different Vigor Mesh version with the DrayOS5 models. Those models should be Wired connected and be managed by AP Management in the Virtual Controller.
Follow the steps below to manage Nodes using AP Management:
Note:
- All Nodes are in the default configuration and do not change the password of the admin account in this example. If we have logged in to node and change the password, the status will show "Auth Fail" after it joins the device list. It is recommended that the node be reset before the deployment.
1. Place Nodes where we want to extend the WiFi coverage. And connect them to the same gateway with the Root by Ethernet cable.
2. Power on Nodes. Access the WUI page of the Root and navigate to the AP Adoption tab under Wireless / Device.
- Click Scan to find other nodes.
- Select Nodes and enter the name for them.
- Then click Apply and wait for the process complete.
3. Wait for all Nodes to sync settings with the Root. Once the configuration sync is complete, each Node's status will be displayed as Online in the Device List, and all APs will share the same SSIDs.

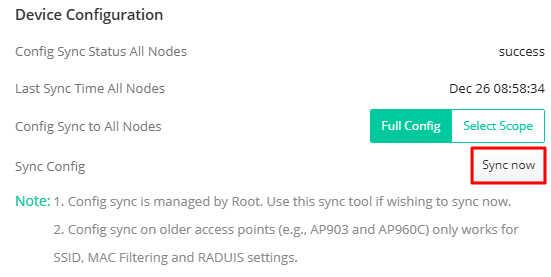
Update the New Configuration to all Nodes
The config sync is only triggered when the Root adopts new Nodes or presses the Sync button. If the configuration is modified on the Root, please click Sync now in the Edit menu of the Root to update the new configuration to all Nodes.
Published On:2025-01-03
Was this helpful?