This note will demonstrate how to use URL Filter to block most of the websites from some hosts and allow only a few. while other LAN clients can access the Internet without restriction. This application is ideal for organizations like libraries providing computers at their lobby for the visitor to search for resource and services on their websites, but don't want the visitor to use those computers for other uses.

1. Create Keyword Object for the company's homepage: Go to Objects Setting >> Keyword Object, click on an Index number to edit.
- Enter profile Name
- In Contents, enter the keyword of the website's URL of which you would like to pass.
- Click OK to save.

2. Similarly, create another Keyword Object for Google services.

3. Create a URL Filter to pass websites of which URL contains the keyword: Go to CSM > URL Content Filter Profile, click on a profile Index to edit.
- Enter Profile Name.
- Set Priority to "Either: URL Access Control First"
- Enable URL Access Control
- Set URL Access Control Action to "Pass"
- Click Edit and, in the pop-up window, select the Keyword Objects of the URL you would like to pass.
- Click OK to save the profile.

4. Create a DNS Filter profile to filter HTTPS websites: Go to CSM >> DNS Filter Profile, click on a profile number to edit,
- Enter Profile Name.
- Set UCF (URL Content Filter) to the profile created in Step 3.
- Click OK to save.

5. Apply the URL Filter to Firewall Filter Rule: Go to Firewall >> Filter Setup >> Data Filter Set (Set 2), click on a Filter Rule Index to edit.
- Enable this Filter Rule
- Set Direction to "LAN/RT/VPN->WAN."
- (optional) Edit Source IP if you'd like to apply this rule to specific IP range only.
- Set Filter Action to "Pass Immediately"
- Set URL Content Filter to the profile created in Step3
- Click OK to apply

6. After the above configuration, the router will block most of the websites.

However, the websites of which URL contains the specific keywords are still available.

Method 1: Firewall Filters
Go to Configuration > Objects > Keyword Object, and add a keyword draytek.com

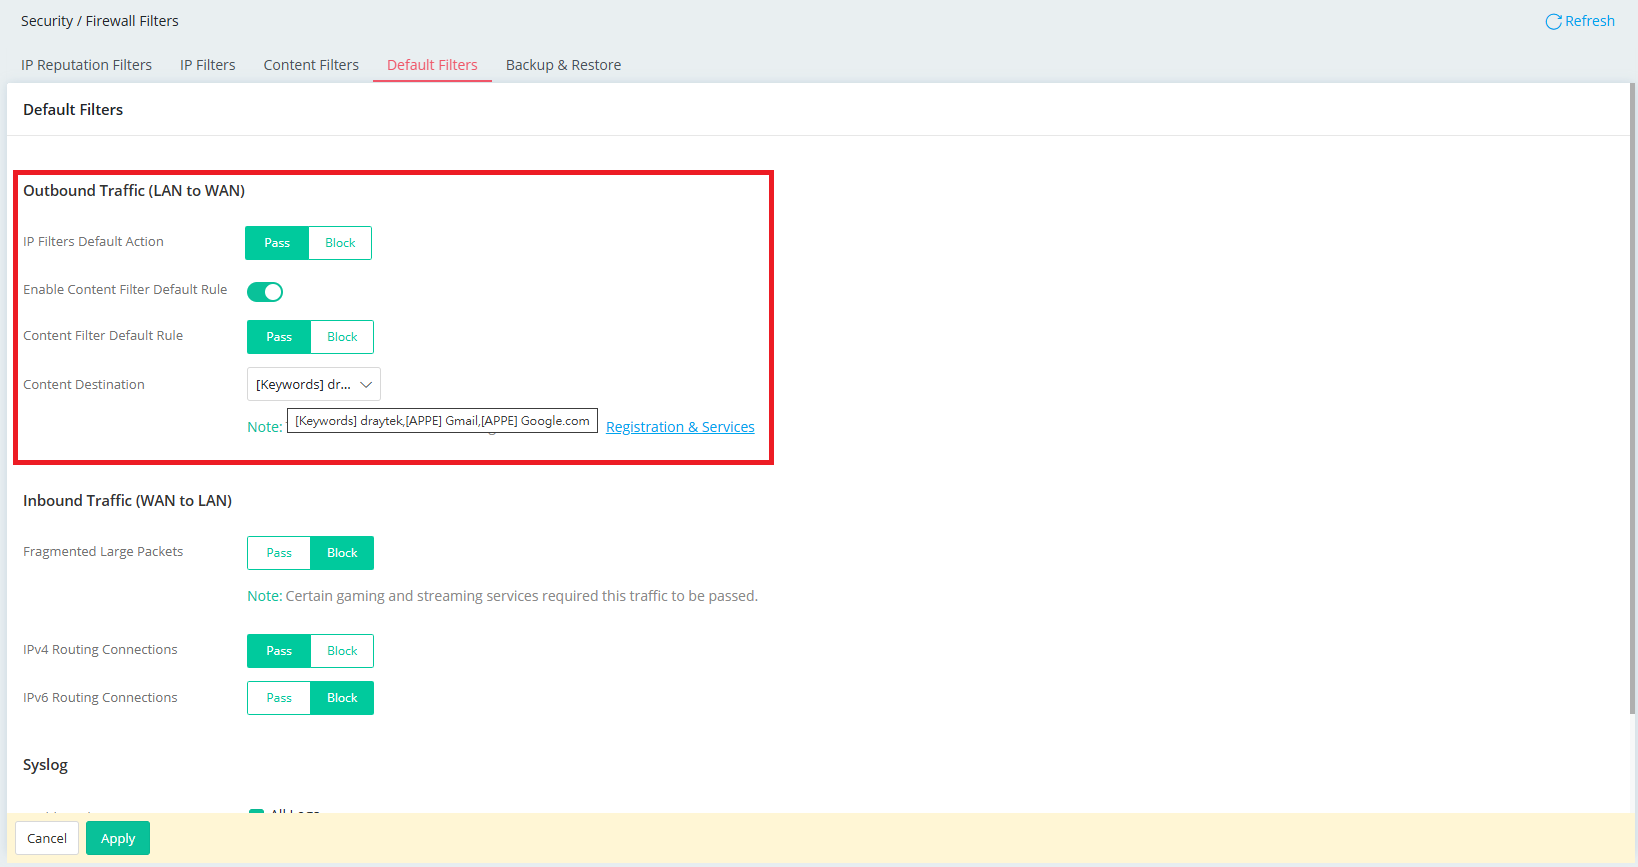
Go to Security > Firewall Filters > Default Filters
- Pass Outbound Traffic by default
- Enable Content Filter Default Rule
- Pass keyword draytek and APPE gmail and google.com
- Apply the settings

Method 2: IAM Group Policy
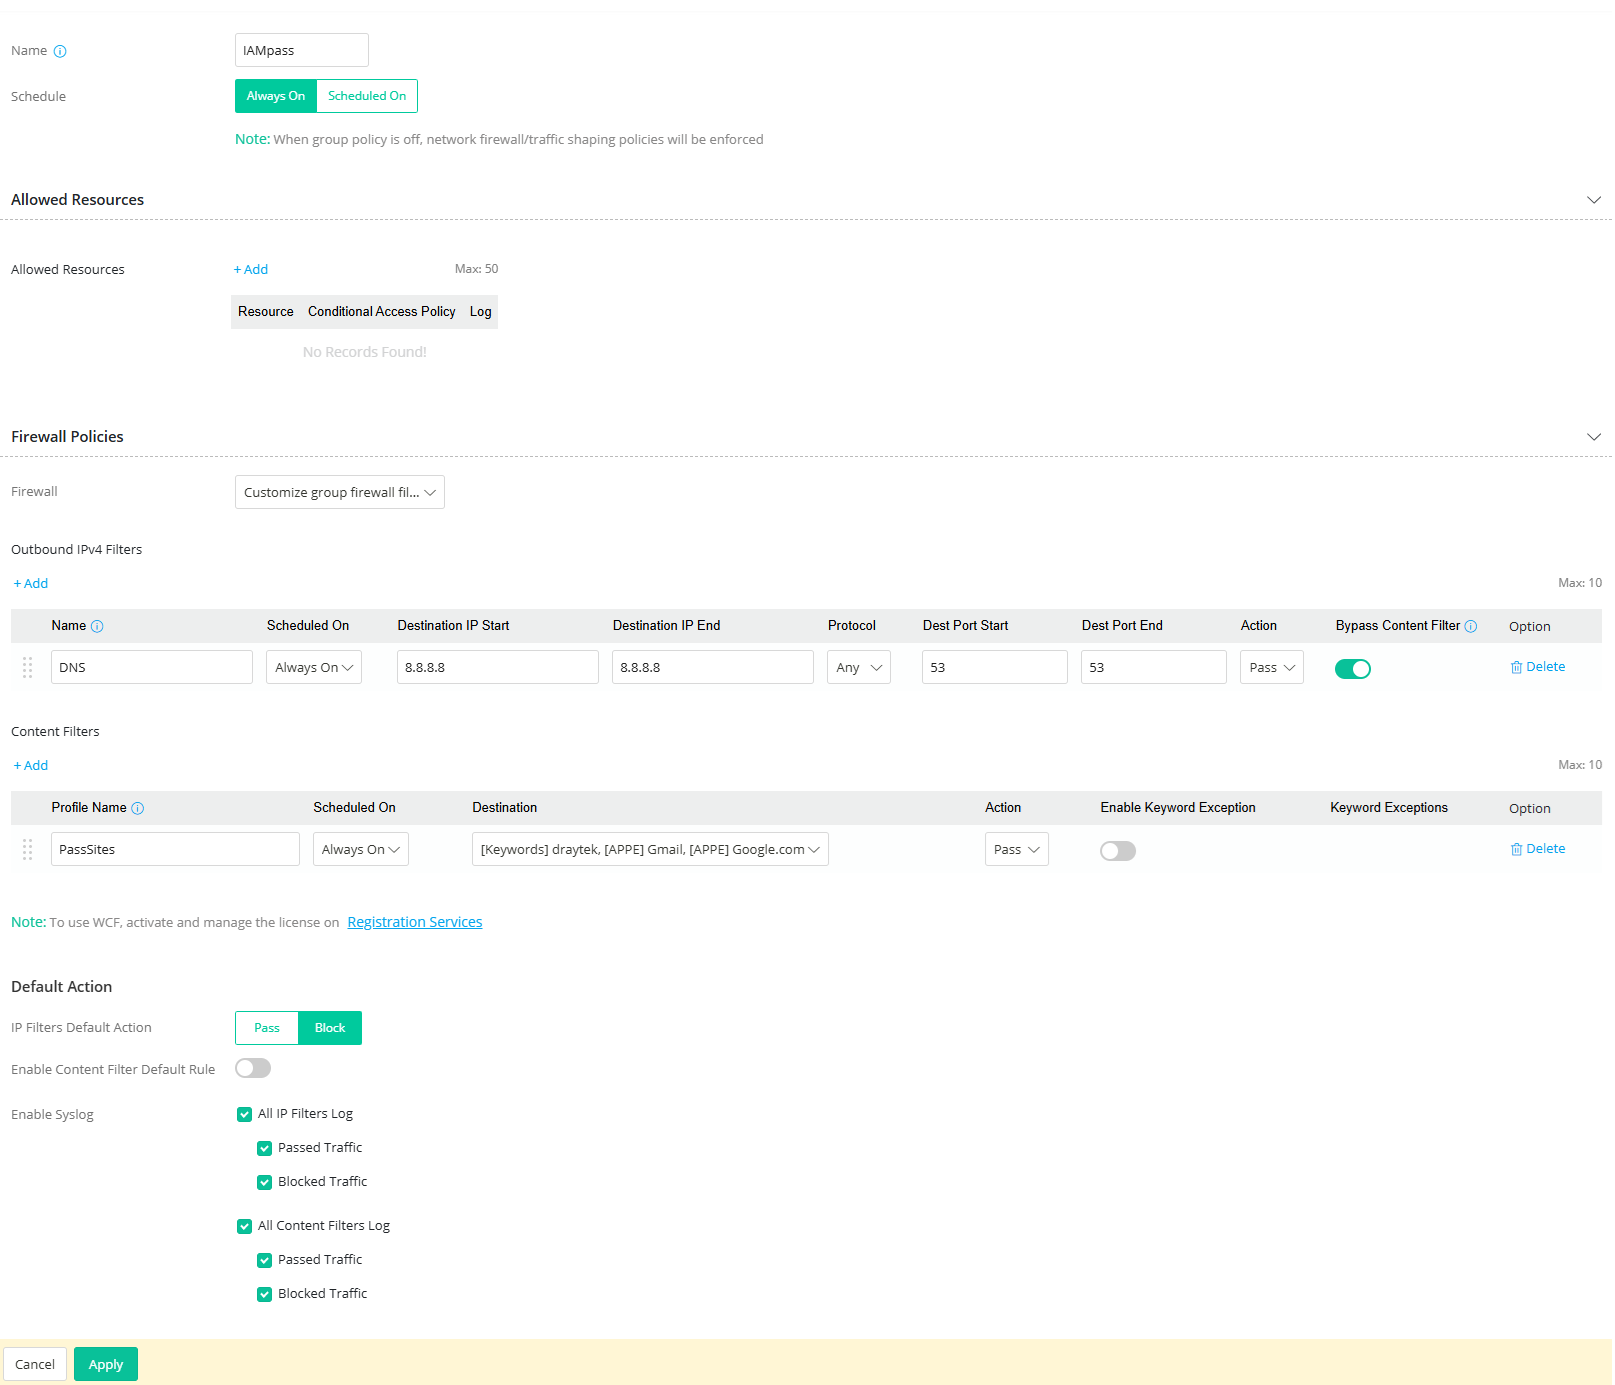
Go to IAM > IAM Policies > Group Policies, and add a group policy
- Give a policy name
- Select Customize group firewall filter
- Add an IP filter to pass 8.8.8.8:53 for the DNS service
- Add a content filter to pass keyword draytek and APPE gmail and google.com
- Default Action Block
- Apply the policy

Go to IAM > IAM Policies > Apply Policies to LAN, and select the group policy for individual VLAN.

Vigor is blocking the most of the websites except draytek.com, gmail and google.com by either methods above.

1. Create an IP Object for the IP address in the lobby. Go to Objects Setting >> IP Object, click Add to create a new profile.
- Enter the Profile Name.
- Select Address Type as "Range"
- Enter Start IP Address and End IP Address as the IP address range for the devices at the lobby.
- Click Apply to save.
2. Create a Keyword Object for the URL to pass. Go to Objects Setting >> Keyword Object. Click Add to create a new one.
- Enter the Profile Name.
- Click Add to add a new keyword.
- In the Member Table, enter the keyword of the URL that is allowed to pass.
- Click Apply to save.

3. Set an IP Filter to block all the pages if the packet is from the lobby's IP address. Go to Firewall>> Filter Setup >> IP Filter, click Add to create a new Group. Enter the Group's name and click Apply to save.

4. In the Group created in the previous step, add a new profile:
- Enter the Profile Name.
- Enable this profile.
- For Action, select "Block If No Further Match".
- For the Source IP Object, select the IP Object we set for lobby's IP addresses.
- Click Apply to save.


5. Set a URL/Web Category Filter to allow accessing a specific website. Go to Firewall >> Filter Setup >> URL/Web Category Filter, click Add to create a new profile.
- Enter the Profile Name.
- Enable this profile.
- For Source IP, select the IP Object we set for lobby's IP addresses.
- At Action Policy > Keyword Accept, select the Keyword Object we set for the URL to pass.
- Click Apply to save.


Verifying the Setup
With this configuration, for LAN client whose IP address is in the range between 192.168.1.10 to 192.168.1.20, which should be the computers at the lobby, the connection will be fine when they try to access the website with URL containing the keyword.

But when trying to access other pages, an error message will appear.

On the other hand, if the LAN client's IP address is not in the range of 192.168.1.10 to 192.168.1.20, they will be able to access the Internet without restriction.

Published On: 2017-10-03
Was this helpful?
